corona

Buy Now

COVID-19 updates

Translate into your own language

Saturday

CSS


Hello Guys! you will be glad to know that the basics of HTML in our tutorial is completed till HTML Form Submission now we are moving on CSS Section of this tutorial , It's very interesting and very easy as compared to HTML,So why are you wasting your time just read the whole introduction about CSS and remembered you should never be upset about some new things like CSS, because as you know that my purpose is to guide you from beginner to expert in Front-end Web development(HTML,CSS and JavaScript).So, keep learning with me you will find out all that you need in your Front-end web development career.


CSS Introduction


In this part of tutorial I will tell you about CSS,What is CSS,How can we use it in our HTML Websites ,CSS Text,CSS Font,CSS Background,CSS Links and a lot more things that are used to make our website more stylish.But before moving into these all things first, we should understand thatWhat is CSS

.

Section 2:Part 1


What is CSS?


CSS Stands for Cascading style Sheet,we can say that CSS is a plain text file to store properties,also describes the look and formatting these properties that how the content of our web page should be display on the website.By using CSS we have access control to make any type of global change and apply this change into our websites. In other words we can say that CSSis the key presentational technology that is used to design websites.


What is StyleSheet?


We can make nay part our website stylish like,fonts,colors,backgrounds etc, but one thing that we must need is a Stylesheet.The Stylesheet is attcah with our HTML code or we can say that it is acts as a partner of HTML code file,and it is used for taking care of all styling layouts, fopnts, colours and overall look of our website.

How can we make a CSS stylesheet?


Making a Cascading styleSheet is very simple,just like HTML file extension we should need to create a simple blank file in any ".text" extension like notepad or notepad++ and save this file with extension ".css" our Cascading style sheet is created.
If you ever decide to change the look of your site, you modify that one CSS file (your style sheet) and all the HTML pages reading from that file will display differently. This makes maintenance of our design much easier.


Thursday

Tutorial-7(HTML Submission Form)


Welcome in Tutorial-7


Hello everyone! Hope so you are all well.In previous Tutorail-6( HTML Forms )we learnt about HTML Forms How can we make simple forms using different Input fields.Before moving into our new tutorail which is about Form Submission I want to tell you my purpose which I told in every lesson.

As you know guys my purpose is to guide you from beginner to expert in Front-end Web development(HTML,CSS and JavaScript).So, keep learning with me, visit on my previous tutorial you will find out all that you need in your Front-end Web development career.
Guys! today's lesson is very simple and interesting as compared to previous lessons
In previous lesson we had only read about some fields in our form,and not discussed about how the form can be submit,which is the only important part of form,the submit button.

Section 1: Part 7


HTML Form Submission

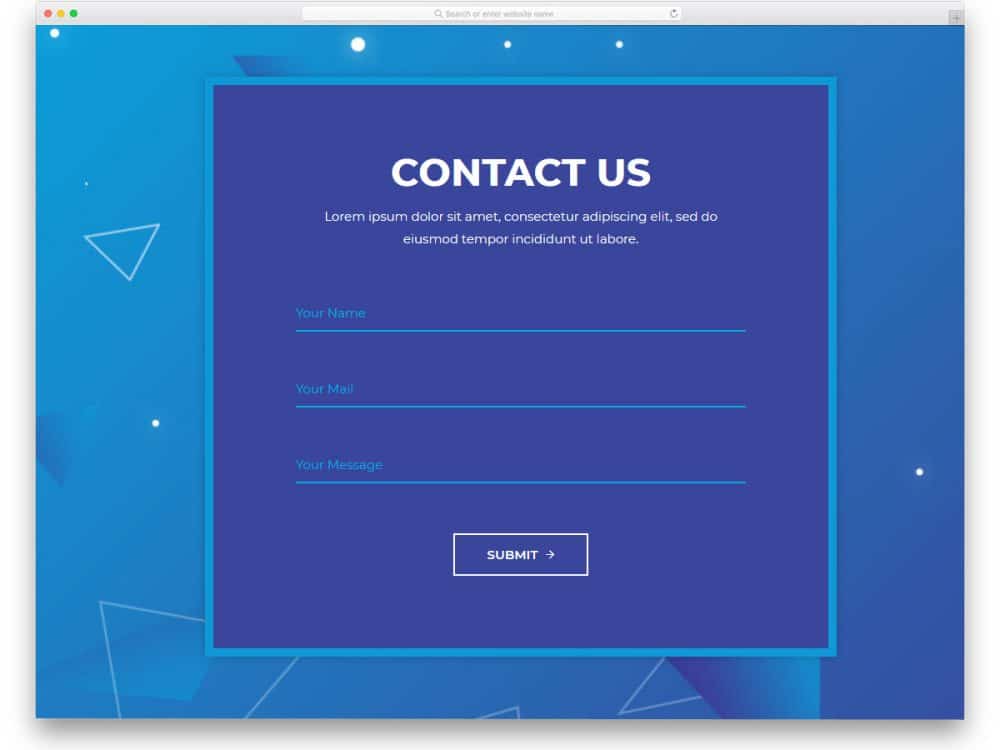
In every forms like contact,comment,survey type,we have seen a button like Submit,Click here,Send, and when we click on that button our task is completed and send to the destination where we want to send it.


After we can creating a form, a Submit Button is required for users of our website to click on that button and process data after filling out a form.This submit button is created using the input field as we used in previous lessons of type text,email etc just like that we used the input field of type "Submit"this Submit is a attribute of input field whose value is submit type.The value attribute is used to specify the text that appears within the button.

look into the image you can easily understand!

Now we put the above code in our previous HTML Form code


Output:


For today's lesson I think that is enough.
See you in the next Tutorail!


Tuesday

Tutorial-6(HTML Forms)


Welcome in Tutorial-6


Hello Guys! Hope so you are all well,stay home and save your life.In previous Tutorial-5(Tables in HTML) we read about in detailed about HTML Tables, discussed actual definition of tables,also learn about which Tags are used to make a table and also we discussed that How can we arrange our data in tabular form using HTML..

As you know guys that my purpose is to guide you from beginner to expert in Html,CSS and JavaScript so keep learning with me you will find out all that you need in your Front-end Web development career.

In today's tutorial we learn about HTML forms. As you know that forms are an important part of any websites,especially for survey,admissions in universities,or in any site that provide us registrations before using , and there are millions of websites that provide us registration forms,and forms are an important part of interaction between admin and users like comment section of any websites is a type of form.Comment part of our website is the best way for getting reviews(feedback) from visitors and it can be made using HTML Forms.

Section 1:Part 6


HTML Forms


Form is a type of document with spaces in which we can write or select,for a series of documents with similar contents.In other words,Form is the shape,visual appearance or configuration of an object.

How can we make HTML form


It's very simple to make a form in HTML.Just remember some important tags that are required, once you kept these tags in your mind, you can easily make any type of form, it's depend upon you.

HTML Form tags


In order to add a form in our website, the <form> tag is used. this <form> tag identifies that on which part of our web page, the control elements will appear.


Guys you should no need to confuse about Control elements, these are some elements that are used while making HTML forms.These Form elements are some input type elements,these input elements are as follows.

  • Text fields
  • Check-boxes
  • Radio Button
  • Submit Button
and so on.

The <input> element


The  <input> element is one of the primary element used to get text from the users of our websites.This <input> element uses the "type" attribute ,this type attribute defines what type of information is to be captured.The one of the most popular "type" attribute is text,which denotes a single line of text input.

Some input types are as follows:


Placeholder


The placeholder is a type of attribute, this attribute helps the user of our websites before they enters a value.Furthermore, in order to write a short hint that describes the expected value of an input field,we used placeholder attribute.The hint which we write in placeholder is shown to users before they enter a value in that field.


The <textarea> element


In HTML Forms ,there's another element which is known as <textarea> element, this element is used to captured text-based data and can accept larger passages of text than <input> element, another useful thing of <textarea> element is that we can easily make <textarea> field re-sizable.


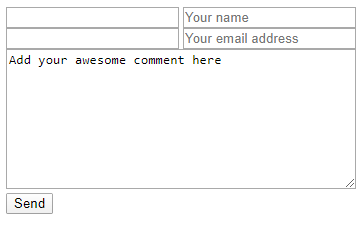
Look into the image ,here a simple form structure .You can easily understand about the all elements.


Output:

In this output ,you can see  (your name,your email address) these are placeholders when we drag our mouse cursor on it and write something, it will be hide,it's just a hint for our users that what they need to enter in that part of field.

I think for today it's enough ,just read the whole tutorial twice , you will be able to make our form just within one minute.

See you in the next tutorial!


Wednesday

Tutorial-5 (Tables in HTML)


Welcome in Tutorial-5


HELLO Guys,as you know my purpose is to guide you from beginner to expert in html , CSS and JavaScript so keep learning with me you will find out all that you need in your Front-end web development career.

In previous Tutorail-4 (Navigation)we had learn about navigation that what is navigation,how can we add menu in our HTML website using nav bar,unordered lists, list items etc.In this tutorail I will tell you about Tables in HTML, that how can we create them using simple tags, As we know guys that tables are very important part of any program , in order to save our budget record, for showing results of our selling, and a lot more things , we can easily save this records in a simple way but when we save them in an order(table) it's easy for us to manage.
Let's read in details about Tables.


Section 1: Part 5


HTML Tables


Tables are basically a way to arrange our data in rows and columns, we commonly used tables to represent tabular form of data like lists of products etc. But here our question is that 

How can we arrange the data of our web in tabular form using HTML?


It's really very simple to make HTML Tables  Following are some tags that are required for making a table.

HTML Table Tags

  • <table>        
  • <th>
  • <tr>
  • <td>
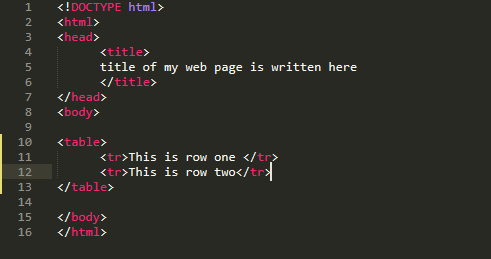
The First <table> tag defines a table that means data will be formatted as a table and <tr> tag is used for rows and <td> tag for data we can add multiple rows and columns for our data representation by giving them size . The <td> tag defines a cell and with these cells we can create columns in our table row.Let's look into the image that how can we implement these tags in an HTML code.


In the above image we just created rows not cells, In <tr> tag I just wrote This is row one,two for your guidance ,that doesn't meant that we write anything between  <tr> tag for data writing we need <td> tag, means for cells we must need a <td> tag which is used for creation of columns in these rows, we will implement this <td> tag in <tr> tag, in following image, this code give a complete format of table with rows and columns.


In above code, you have seen that there are two rows <tr> elements, in which three cells <td> elements of each rows contain some data.The output of the above code is as follows.

Output:


This is a simple format of an HTML table ,there's no boundaries of table, remember in HTML we just create a structure not styling, these things(boundaries Styling) are related to CSS section of this tutorial.

Table Header <th>


Once we have created a row and columns , we noticed that there's a need of header ,means table header, for table heading we used a <th> tag which designate the headings of row and columns of cells,there is another tag which is known as <caption> tag used for Table Heading and we must write this after <table> tag.

But Guys be attentive in difference of these two tags , just remember the <th> tag is for rows and columns heading and <caption> is for whole table heading.

Just look into the code you can easily understand.


Output:
                        
Now from above code with output , I' m sure you can easily understand , in my point of view I think it's not difficult to build table in HTML , as compared to previous tags , table tags are max , but if you will practice for this, you not need to search on Google. For Today I think It's enough for you, go home and practice hard.

See you in the next tutorial!.

Tutorail-6(HTML Forms)


Friday

Tutorial-4 (Navigation)


Welcome in Tutorial-4

As you know my purpose is to guide you from beginner to expert in html , CSS and JavaScript so keep learning with me you will find out all that you need in your Front-end web development career.
In previous lesson we had learnt about Multimedia that how can we implement images,videos,audios in our websites in order to make it more attractive, but along with this we also want to become famous ,getting reviews on our work from viewers.For this purpose, there's a need of connection between us and our websites viewers and this is only possible when we have a contact me or contact us page in our website So, in this tutorial we will learn about how to create a "Contact Me" using "Navigation" tag in our html website.

Section 1: Part: 4


Navigation


According to computer Science, Navigation refers to the cat of opening and moving through computer menu, for example the Start menu in our Window Explorer.In other words, Navigation word refers to clicking or tapping buttons and menus or making multi-finger gestures to activate functions in an application or to jump to other sections of a website.

What is Navigation in html?


In Html code, in order to implement table of contents, menus the <nav> bar is used, this <nav> element represents a section of a page whose purpose is to provide navigation links ,either within the current document or to other documents. Some common examples of navigation sections are menu,table of contents,indexes etc.

Navigation bar


The viewers like your website if your content is well organized, so , in order to make our content organized and well follow, we need a Navigation bar .The Navigation bar is list of links like home, About me, contact us, news etc or any other type of menu in websites like in the picture below.


Followings elements are must to create Navigation in Html Code:


  • The <nav> element, is must in order to identifies our the menu section of our website page.
  • The <ul> element, this is called an unordered list.
  • The <li> element , this is used to identify the lists of items that are in ul element.
  • The <a> element , which identifies the hyperlink.
  • The href element, refers to tell the actual location or destination of the link.
  • The URL attribute, refers to identifies the web address of link.

Html Code:


What is Hyperlink?


Hyperlink is type of link which is highlighted on any web page, on clicking get user from one location to another location, as from my this tutorial page just click on this highlighted word Tutorial-1 you will move on another first page of tutorial because I gave a link of my first tutorial page behind this "Tutorial-1" word.But without a element hyperlink doesn't work ,the a element is used to establish the hyperlink and the word href called " Hyperlink Reference" ,it is required to move web page from one location(resource) to another.

Let's look into the image, you can easily understand


                                          Code                                                                            Output

So Guys I think it's quite easy to add menu in our website we can easily give any specific style to our menu as we want by we will discussed it in CSS section, in this Html section we just learn about content structure and meaning in our website. I hope that through this tutorial you will be able to understand each and very thing in a very detailed view that's why I am only tell you about one specific thing in one tutorial if I will tell you about multiple things in one tutorial then it's not easy for you to read the whole post and also you will not pay attention to everything , In my one page tutorial only give your 10 minutes in this busy schedule life and I'm sure you pick things ion your mind very sharply.See you in the next tutorail which is about tables in HTML.

Tutorial-5(HTML Tables)


Introduction